Filecoin Pin CLI Walkthrough
Update: 10.14.2025 9:00 AM PDT
How to use the Filecoin Pin CLI to store IPFS data on Filecoin
📦 Stored on IPFS + Filecoin
This page is automatically uploaded to decentralized storage. Access via root CID without specifying filename:
•https://ipfs.io/ipfs/<CID>/(auto-serves index.html)
•https://<CID>.ipfs.dweb.link/(auto-serves index.html)
Check the latest upload logs for the current root CID.
Get Started Now
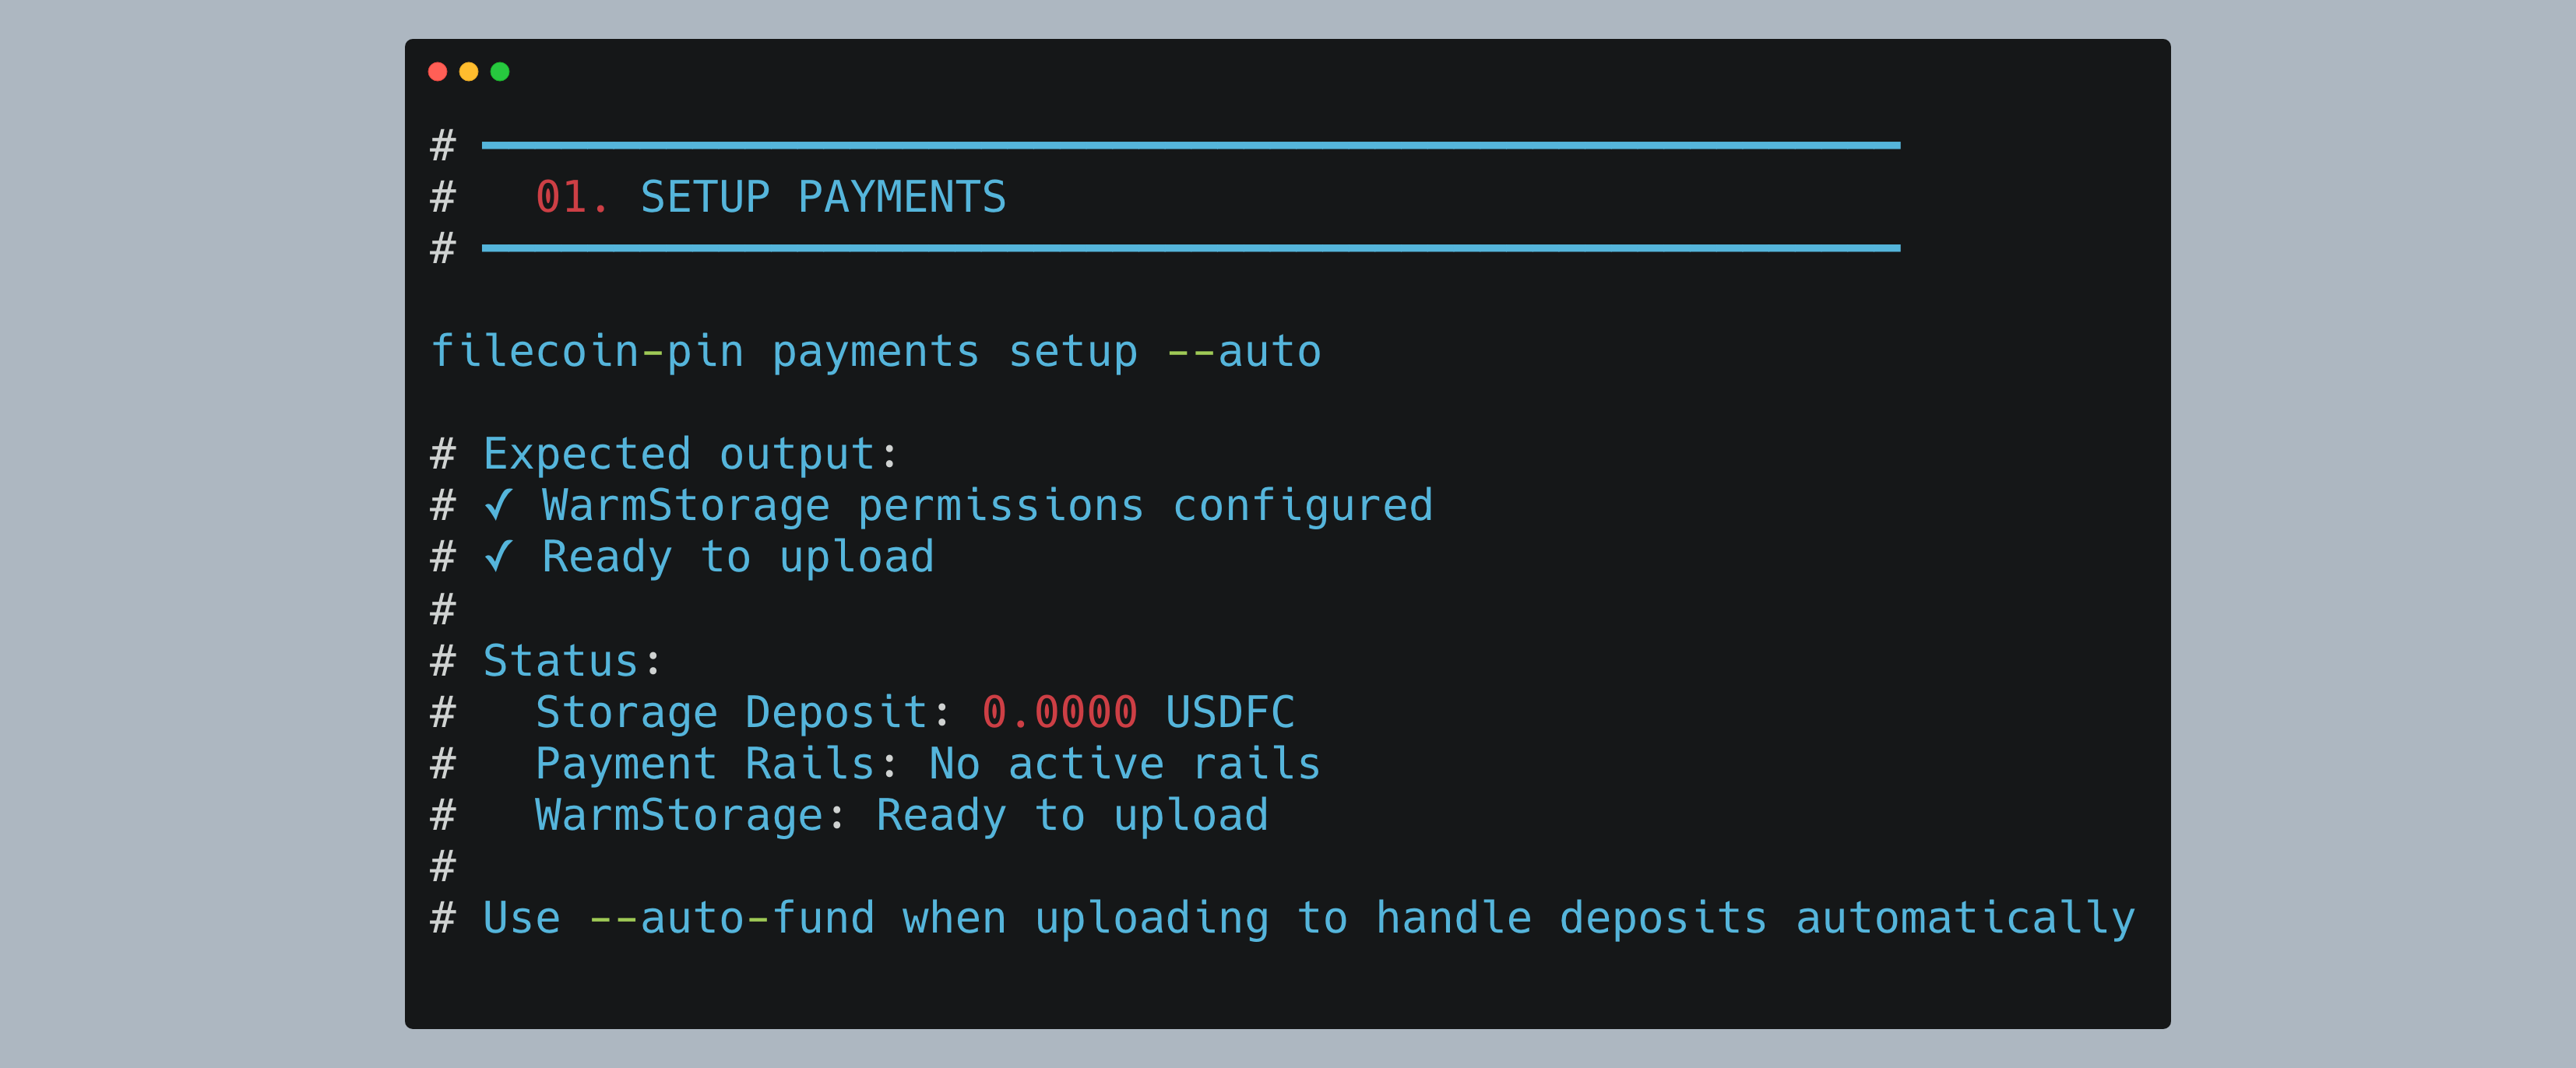
1. Setup Payments
Configure permissions for automatic payment handling:
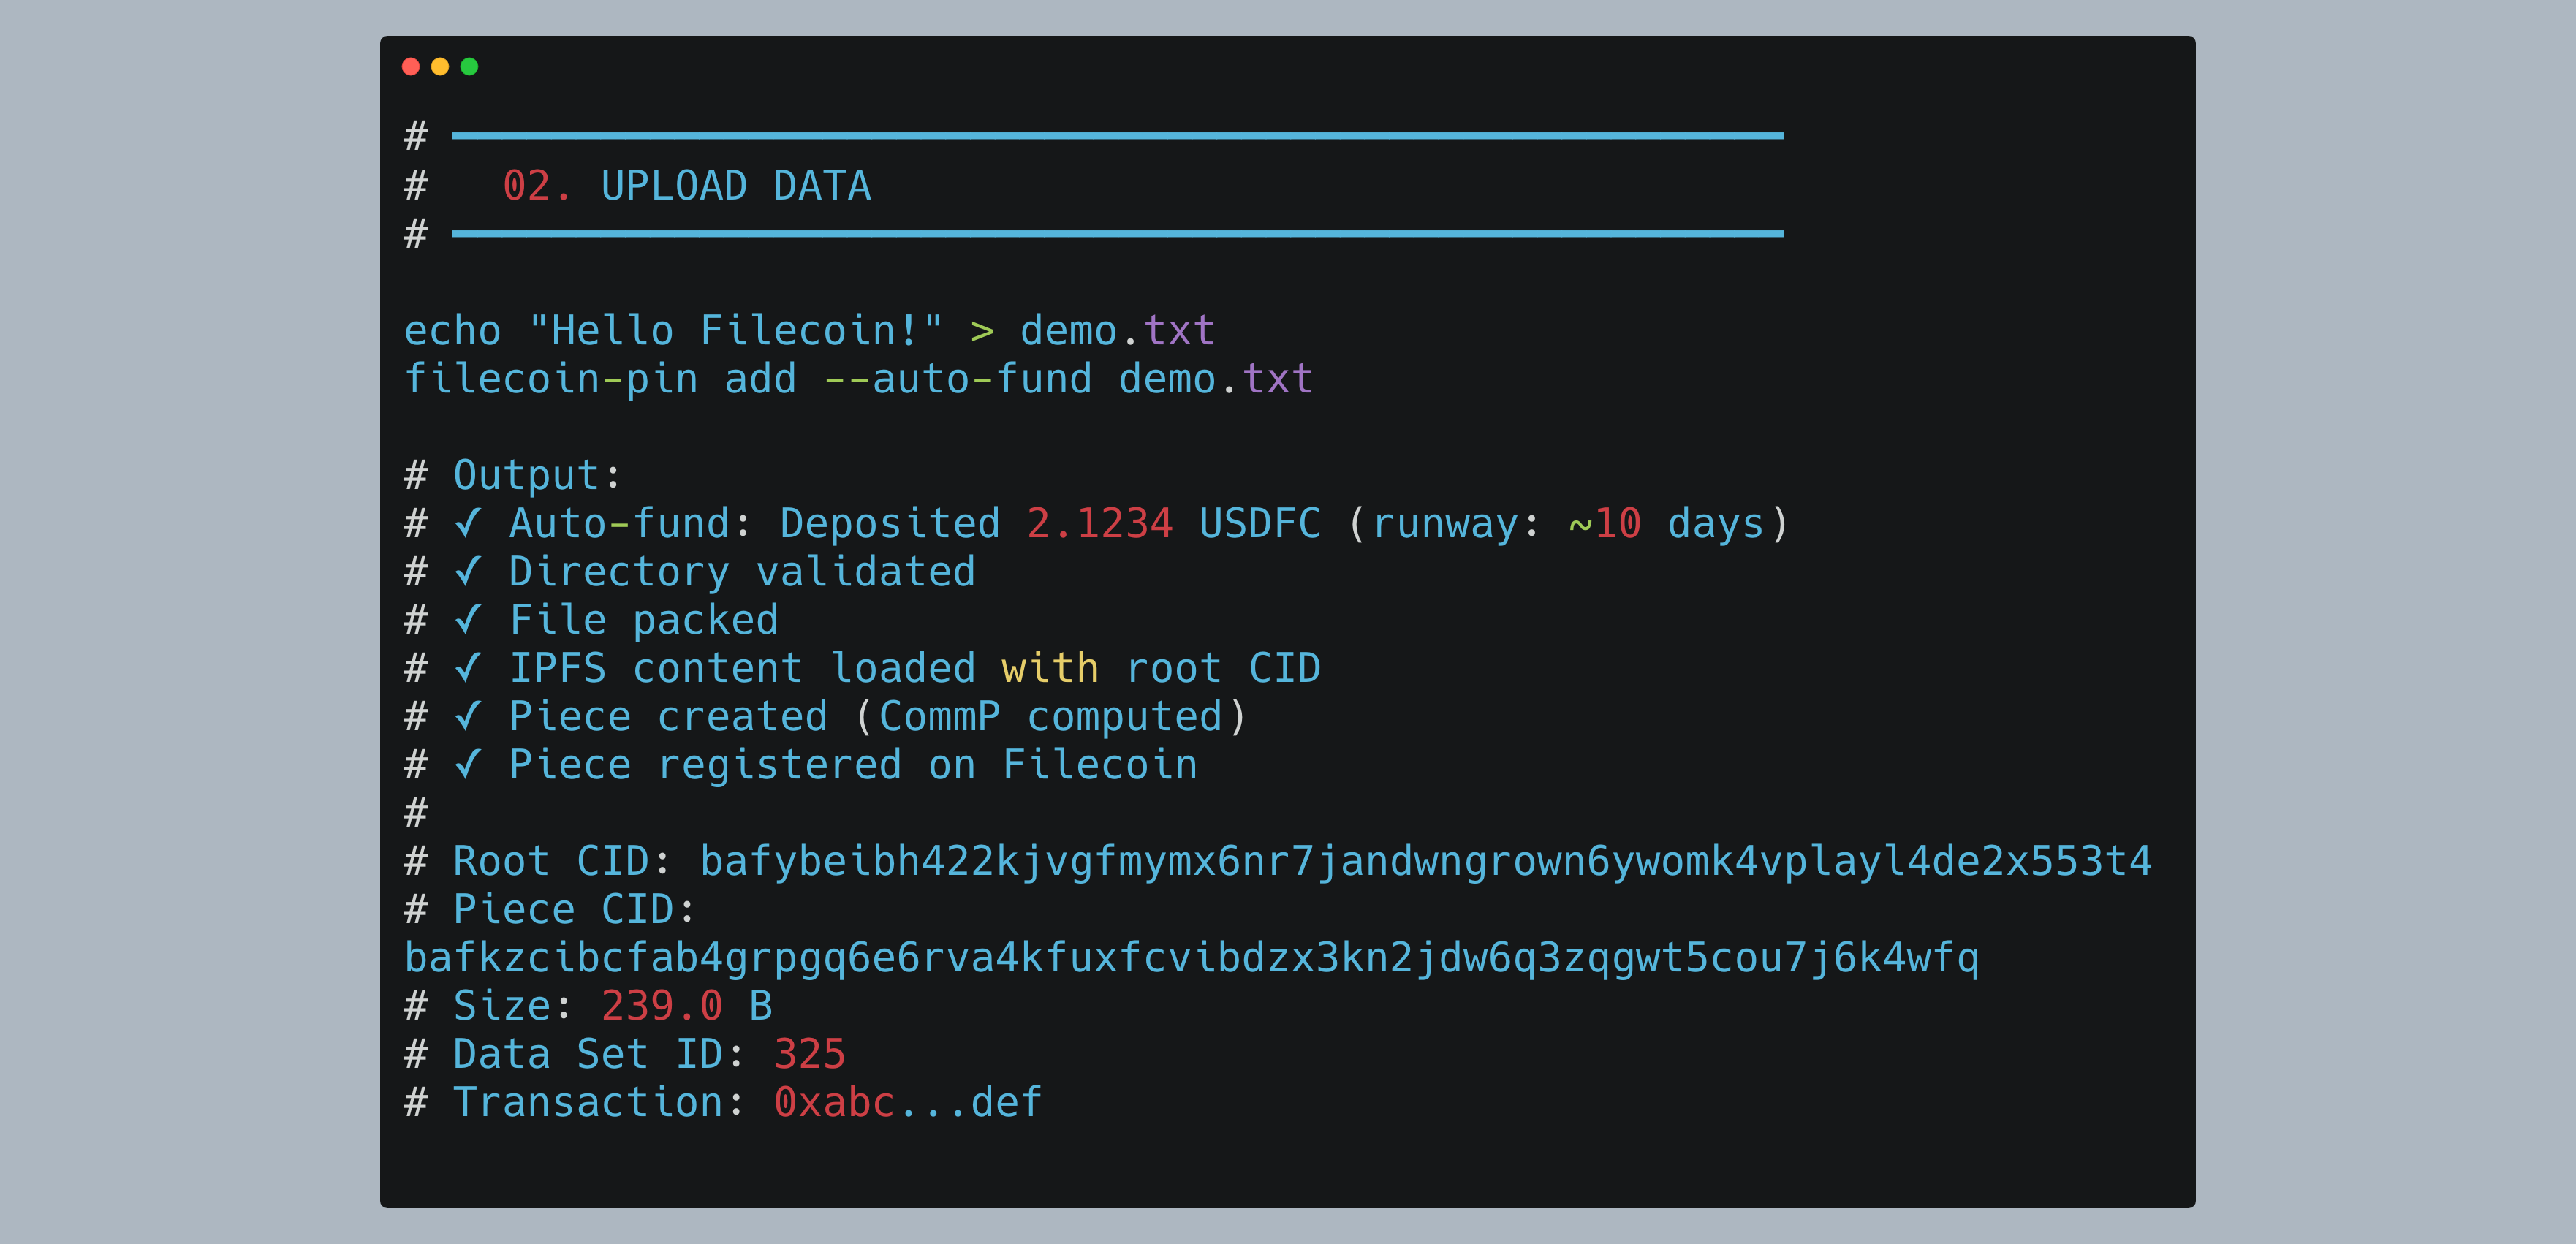
2. Upload Data
Upload your file with automatic funding:
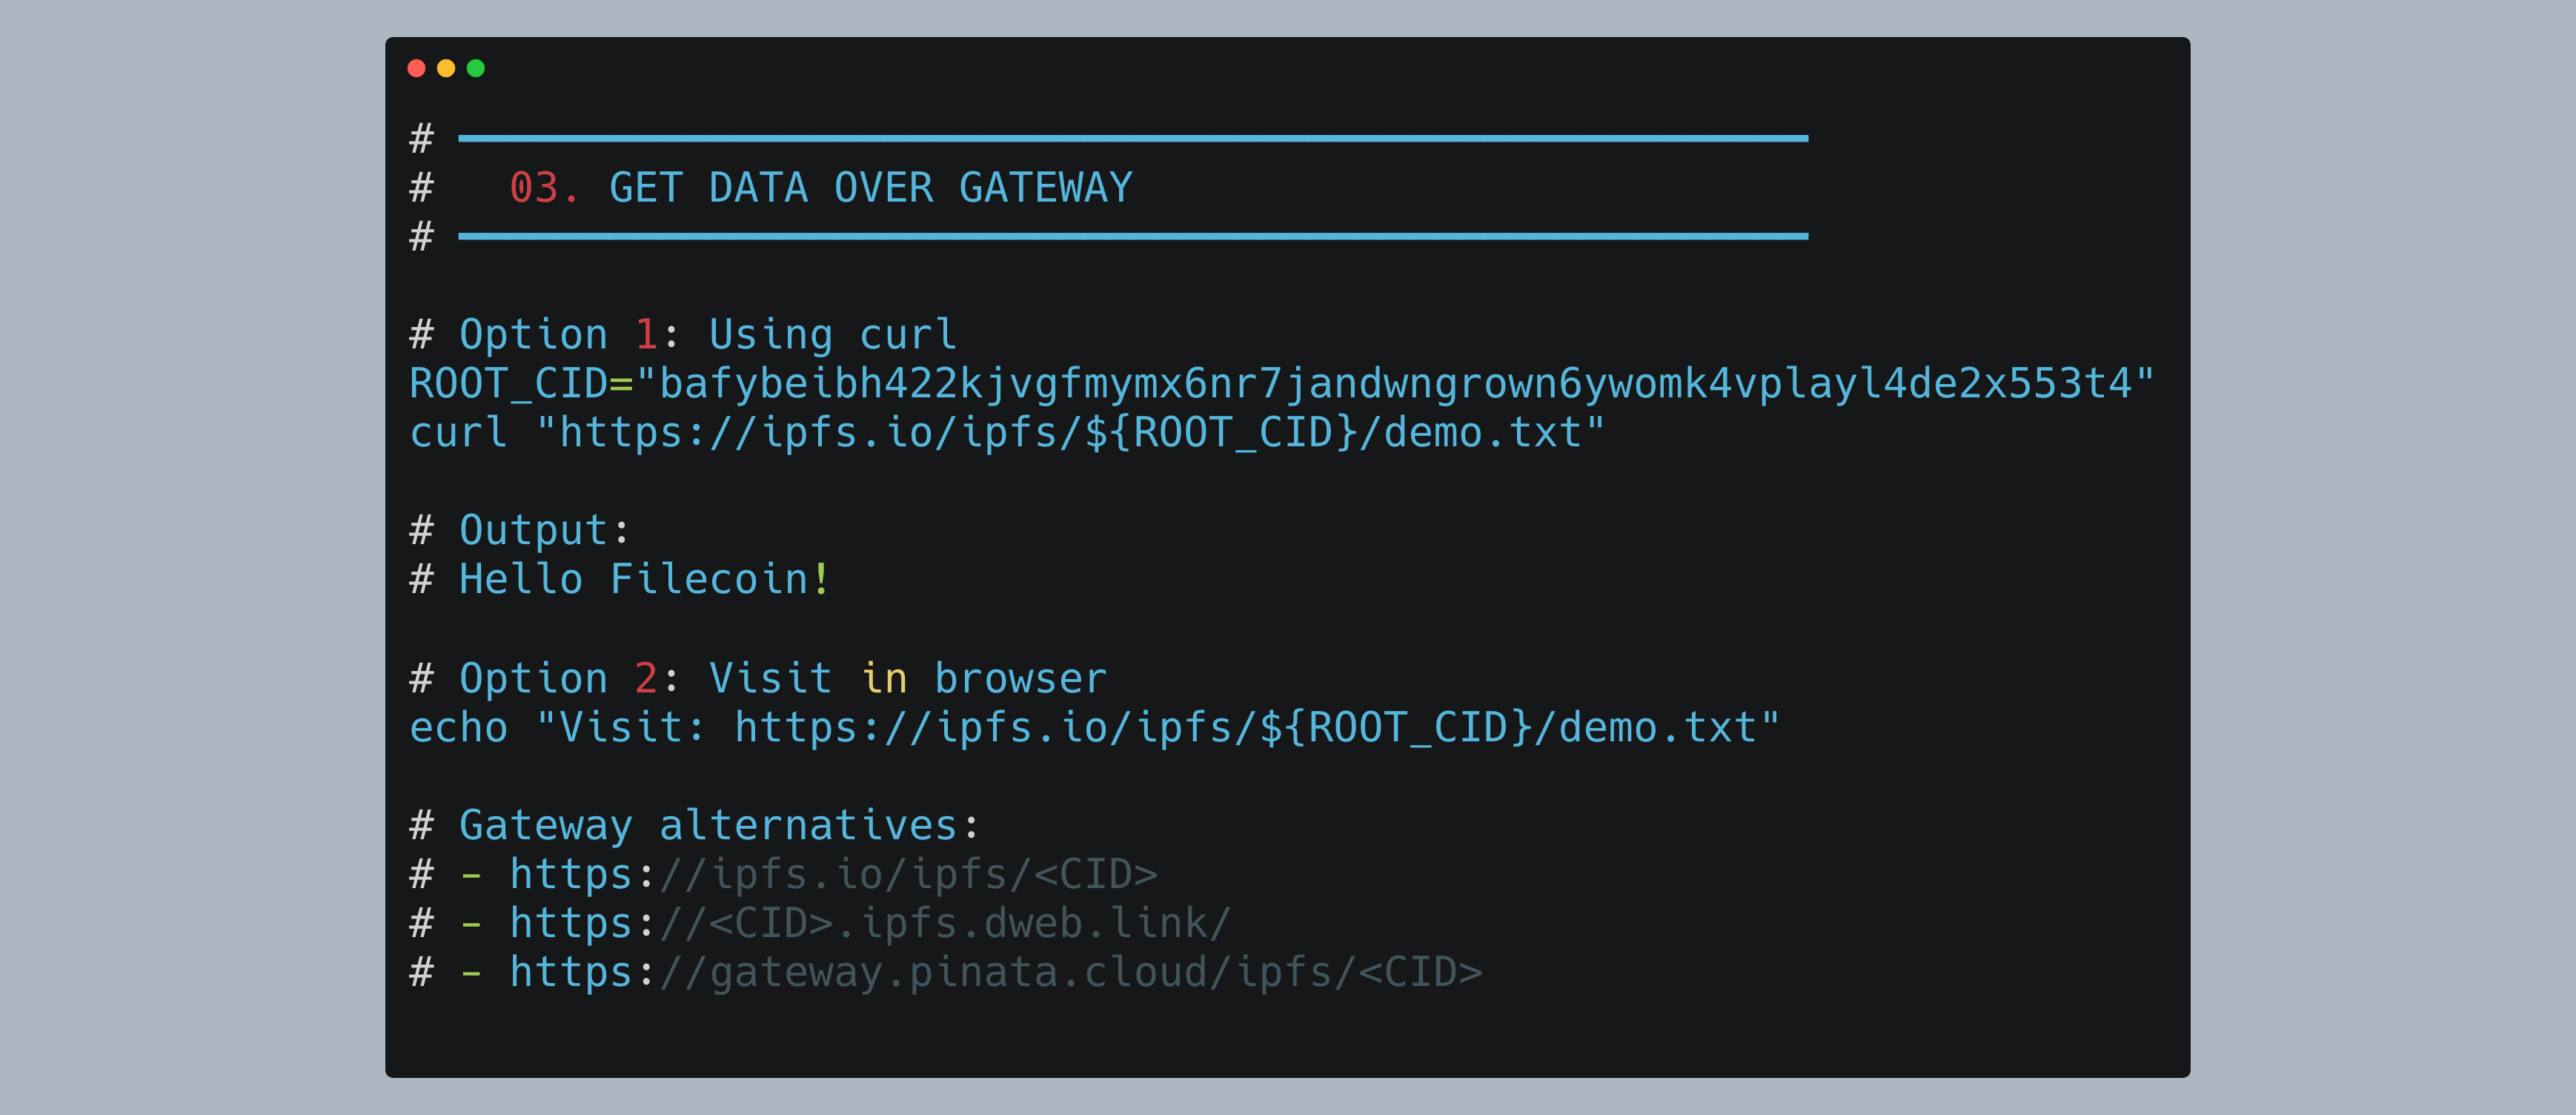
3. Retrieve over an IPFS Gateway
Retrieve your data using the IPFS gateway:
4. Prove Storage
Verify your data is stored with cryptographic proofs:

NOTE! For demo purposes, I have created a THROWAWAY PRIVATE KEY. NEVER USE YOUR PRIVATE KEY IN A REPOSITORY OR EXPOSE IT. The repo references using your private key LOCALLY as an ENV VARIABLE. When you create a GITHUB ACTION, use GITHUB SECRETS to store your private key.
Who is this for
- Existing IPFS developers who want to use Filecoin to persist their data
- Technical users who want to use GitHub Actions to automate deployment of IPFS Files onto decentralized storage
- Agent builders that want to store their agent cards and validation materials on Filecoin for cryptographic proof of storage
Prerequisites
Install Required Tools
# Install Node.js 22+ (required for filecoin-pin)
nvm install 22
nvm use 22

# Install filecoin-pin globally
npm install -g filecoin-pin

# Install ipfs-car (for CAR file operations)
npm install -g @ipld/car-cli

# Install GitHub CLI
brew install gh  # macOS
# or
sudo apt install gh  # Ubuntu/Debian

# Install Foundry (for wallet operations)
curl -L https://foundry.paradigm.xyz | bash
# Then run this in a new terminal:
foundryup
Verify Installation
filecoin-pin --version
# Expected: filecoin-pin v0.6.0 (or later)

gh --version
# Expected: gh version 2.40.0 (or later)

node --version
# Expected: v22.x.x or higher

cast --version
# Expected: cast 0.2.0 (or later)
Part 0: Wallet Setup from Scratch
Note: Thefilecoin-pinCLI expects aPRIVATE_KEYenvironment variable. This section shows initial setup.
Step 0.1: Generate a New Wallet
Generate wallet using Foundry:
cast wallet newSave the private key and wallet address.
Step 0.2: Get Testnet FIL
Get 100 tFIL from ChainSafe faucet (requires browser):
open "https://faucet.calibnet.chainsafe-fil.io/funds.html"Step 0.3: Get USDFC Stablecoin
- Setup MetaMask with Filecoin Calibration (1-click import available)
- Import your private key to MetaMask
- Visit USDFC minting app
- Mint 200 USDFC using 98 FIL collateral
Final state: ~2 tFIL (gas) + 200 USDFC (storage payments)
Step 0.4: Create Environment File
I put my private key on this repo for DEMO purposes. It is a TESTNET KEY. NEVER USE YOUR PRIVATE KEY IN A REPOSITORY OR EXPOSE IT.
Save your credentials locally for easy reuse:
cat > ~/.filecoin-pin-env << 'EOF'
export PRIVATE_KEY="0x8eef...c414"
export WALLET_ADDRESS="0x5a0c7D45C3834E4eB18c26C60932B757A43B7B0B"
export RPC_URL="https://api.calibration.node.glif.io/rpc/v1"
EOF

# Load variables
source ~/.filecoin-pin-env

# Verify
echo "Wallet: $WALLET_ADDRESS"
echo "Private Key: ${PRIVATE_KEY:0:10}..."
echo "RPC URL: $RPC_URL"
Step 1: Setup Payments
All commands in this section use the environment variables set in Part 0 (Step 0.4). If you're starting a new terminal session, reload them:
source ~/.filecoin-pin-envNote: These commands work directly without running a server/daemon. ThePRIVATE_KEYandRPC_URLenvironment variables must be set.
Configure payment approvals (permissions only - deposits handled automatically with --auto-fund):
filecoin-pin payments setup --autoWhat--autodoes: Configures WarmStorage contract permissions automatically. No deposit required at this step - use--auto-fundwhen uploading to handle deposits automatically.
Step 2: Upload Data
Use --auto-fund flag to automatically handle payment deposits (v0.7.0+).
Upload a file:
# Create test file
echo "Hello Filecoin from CLI!" > demo.txt

# Upload to Filecoin
filecoin-pin add demo.txt
Key values explained:
- Root CID:
bafybeibh422kjvgfmymx6nr7jandwngrown6ywomk4vplayl4de2x553t4- IPFS content identifier for your data - Piece CID:
bafkzcibcfab4grpgq6e6rva4kfuxfcvibdzx3kn2jdw6q3zqgwt5cou7j6k4wfq- Filecoin piece commitment (cryptographic proof) - Piece ID:
0- Reference within the data set - Data Set ID:
325- On-chain data set containing your upload - Transaction:
0xc85e49d2ed745cc8c5d7115e7c45a1243ec25da7e73e224a744887783afea42b- Blockchain confirmation hash - Direct Download URL: Direct link to retrieve your data from the storage provider
✅ Your file is now stored on Filecoin with ongoing proof of possession!
Step 4b: Upload Directory
Package multiple files into a single CAR:
# Create test directory
mkdir my-data
echo "File 1" > my-data/file1.txt
echo "File 2" > my-data/file2.txt
echo "File 3" > my-data/file3.txt

# Upload entire directory with auto-funding
filecoin-pin add --auto-fund my-data/
Key details:
- Root CID:
bafybeig27btater5fpt3l67gbme3sebqk3ynwdhlbrbuk3q7espiyplan4- IPFS directory structure - Size: 433.0 B - Includes all files plus directory metadata
- Piece ID:
1- Second piece in the same Data Set ID 325 - Data Set ID:
325- Same data set as the single file upload (multiple pieces grouped together)
💡 Note: Multiple uploads to the same payment configuration are grouped into the same Data Set, with each upload assigned a unique Piece ID.
Step 5: Prove Storage
Get detailed information about a specific data set (this queries the blockchain directly) that includes proofs:
filecoin-pin data-set 325Expected Output:
Filecoin Onchain Cloud Data Sets

━━━ Data Sets ━━━

Data Set #325 • live
  Managed by Warm Storage: yes
  CDN add-on: disabled
  Pieces stored: 2
  Leaf count: 21
  Total size: 672.0 B
  Client data set ID: 0
  PDP rail ID: 631
  CDN rail ID: none
  Cache-miss rail ID: none
  Payer: 0x5a0c7D45C3834E4eB18c26C60932B757A43B7B0B
  Payee: 0xa3971A7234a3379A1813d9867B531e7EeB20ae07
  Service provider: 0xa3971A7234a3379A1813d9867B531e7EeB20ae07
  Provider: ezpdpz-calib (ID 3)
  Commission: 0.00%

Provider Service
  Service URL: https://calib.ezpdpz.net
  Min piece size: 1.0 KB
  Max piece size: 32.0 GB
  Storage price: < 0.0001 USDFC/TiB/month
  Min proving period: 30 epochs
  Location: unknown
  Payment token: USDFC (native)

Metadata
    source: filecoin-pin
    withIPFSIndexing: (empty)

Pieces
  Total pieces: 2
  Unique CommPs: 2
  Unique root CIDs: 2

  #0
    CommP: bafkzcibcfab4grpgq6e6rva4kfuxfcvibdzx3kn2jdw6q3zqgwt5cou7j6k4wfq
    Root CID: bafybeibh422kjvgfmymx6nr7jandwngrown6ywomk4vplayl4de2x553t4
  #1
    CommP: bafkzcibcjmcnyio2ocxhmtq34uh5ct425xzpnor532zku7tjvqf5toodbxtsqhi
    Root CID: bafybeig27btater5fpt3l67gbme3sebqk3ynwdhlbrbuk3q7espiyplan4
Data set inspection complete
Key information:
Data Set Status:
- live - Data set is active with ongoing PDP proofs
- Pieces stored: 2 - Our demo.txt (#0) and my-data/ directory (#1)
- Leaf count: 21 - Total Merkle tree leaves across all pieces
- Total size: 672.0 B - Combined size of both pieces
Payment Rails:
- PDP rail ID: 631 - Active payment rail for storage proofs
- Payer/Payee - Payment flows from your wallet to the provider
- Commission: 0.00% - No commission on this testnet provider
Provider Details:
- Service URL: Direct access to download pieces
- Storage price: < 0.0001 USDFC/TiB/month (very low for testnet)
- Min proving period: 30 epochs - Proofs submitted every 15 minutes
Pieces:
- Each piece shows its CommP (Filecoin piece CID) and Root CID (IPFS content ID)
- Piece #0 = demo.txt (our single file upload)
- Piece #1 = my-data/ (our directory upload)
💡 Note: This command queries the smart contracts on-chain to retrieve all data set information. The data shown is live blockchain state, not cached data.